A few weeks ago I released mine and Chloe’s christmas photo, or as I like to describe it as, the EPIC christmas card of 2014. It’s definitely more out there, and a lot better executed than last year’s photo we did. I'd say it is much more artistic, and clean. I wanted to do something on par with John Keatley’s christmas photo series. He’s been doing them for a few more years, but I plan on giving him some competition from here on out! I released a short behind the scenes video showcasing a first person shooter perspective, as well as a full look at how I edited the photo in photoshop, bringing all the elements to life. It’s definitely worth a watch, so please check it out. I am writing this post as an outlet to go into further detail about what gear was used, why it was used, how things were done, as well as any other little details I couldn’t share in a short video.
First off we had the concept -
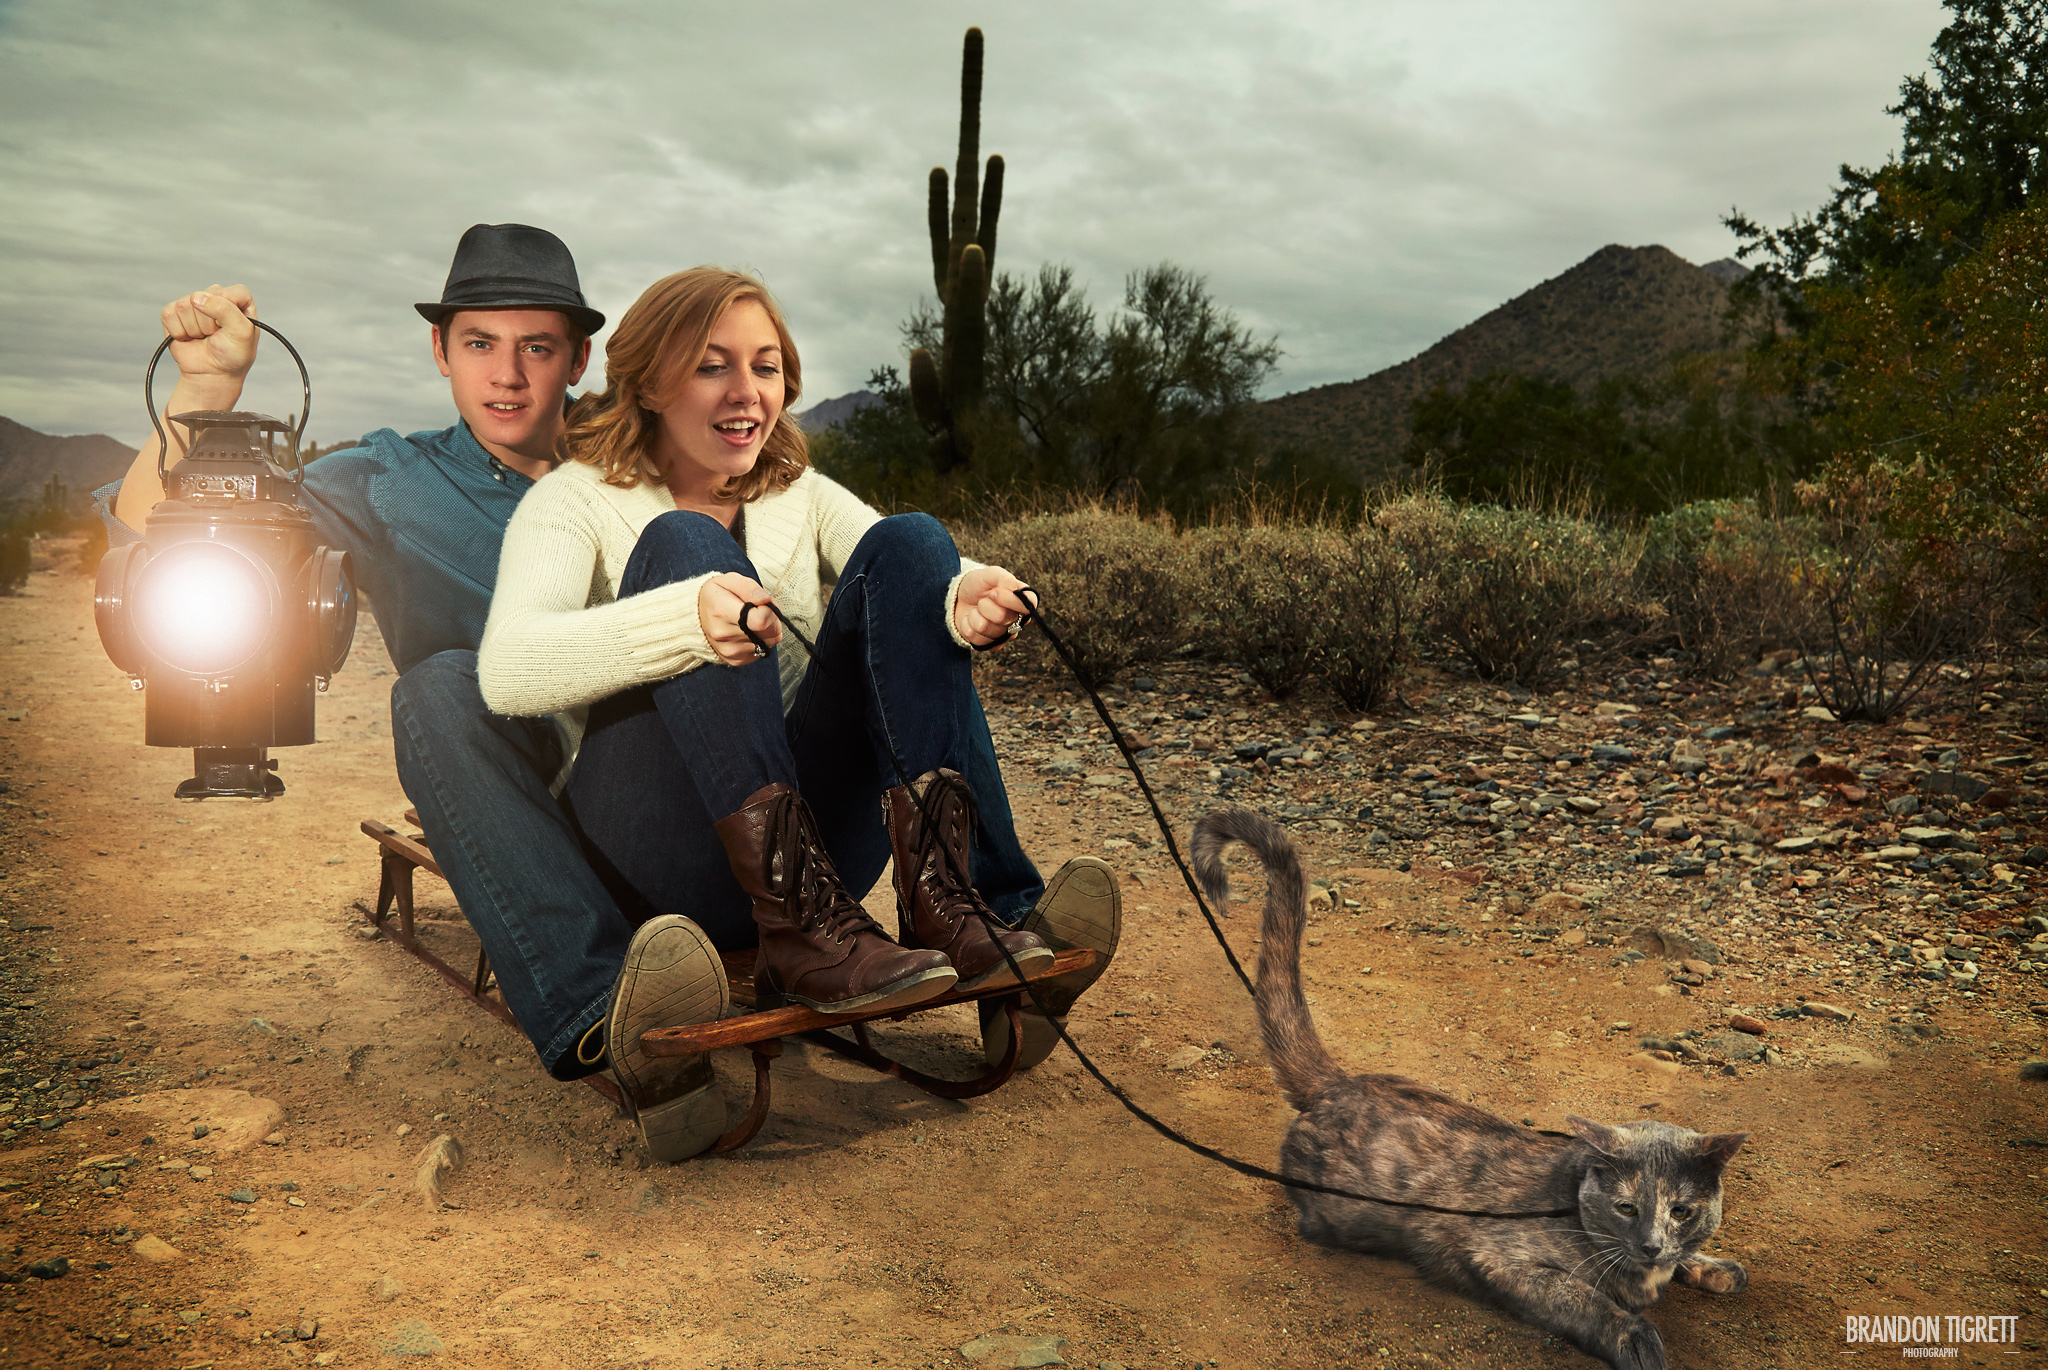
I dreamt up the idea while working out one day. I knew I wanted to shoot something on par with the Keatleys, but couldn’t think of it until that little boost in creativity came while exercising. I wrote down a few notes in my phone using the Evernote app, which I highly suggest for anyone to use, and then when I got home from the gym, I sketched out the idea on paper. I wanted to incorporate our cat Gracie into this year’s card since she has become such a big part of our family, but I didn’t want it to be boring. Nobody was going to be holding the cat. That’s too easy. No, she would be an important part of the scene. So the idea was, she would be pulling us on the sled through the Arizona desert. Something you wouldn’t normally see, but we had to get to the North Pole somehow!
Next was gathering the props -
I had the idea, now I needed the props. Mainly, a sled. We moved out here with what we could fit in and on top of our car. Sadly a snow sled didn’t make the cut. So I put out a crazy request to anyone who knew of or had a sled in Arizona we could borrow for our photoshoot. Surprisingly I got a response back right away and it was exactly what I had thought of in the initial concept! The only problem we would come to realize was, the sled was not meant for 2 full grown adults. A little photoshop magic saved us there, as can be seen in the BTS video. When I went to pick up the sled, Roberta offered a stunning authentic kerosene railroad lantern. I immediately knew it would fit perfectly in the shot. Lastly, we needed something to act as the reigns. Seeing as we were having our cat pull us, I thought a few strands of yarn braided together was comedic and fit well. All the pieces were falling into place, and I was getting very excited.
Finding a location -
It didn’t have to be the best location in the world, the only requirements were, a flat desert trail, with mountains in the background. Basically anywhere in Arizona would work. I had hiked the 104th street trail plenty of times, and knew it would fit the concept nicely, so that’s where we decided to shoot. The other location would be at home in the studio. We couldn’t actually bring our cat out into the desert, she’s too pampered and would probably have been eaten by a coyote. They smell fear! So we decided to shoot her on white seamless and composite her into the photo. Unfortunately we underestimated how much of a diva the cat was, and she didn’t cooperate well for the camera. You can see this in the behind the scenes video here.
The shoot -
Finally, we were ready to shoot! We shot our part first, since we only had the sled and lantern for a limited amount of time, and could shoot in studio anytime. So we trekked about a quarter mile from the parking lot (yeah we’re real explorers…), until we found the perfect spot. I had Chloe sit on the sled and move it around while I composed the shot, making sure to leave room in the foreground for Gracie. Once I decided on a good composition, I prefocused on Chloe, while setting an appropriate aperture to ensure I’d be in focus as well behind her. Once focused, I put the lens on manual focus, and switched on the Canon 6D’s wireless function. This was the first time I’d ever used the wireless function on the 6D, and though the app on the iPhone is pretty rudimentary, it was a huge asset and helped get the shot!
I lit the shot with a mix of 2 LumoPro LP180 speedlites, and the ambient light right after sunset. The key light came from camera right, and was inside a 43inch Westcott Apolo Orb. I used the ambient as fill light, and added in a bare bulb speedlite camera left & slightly behind my position, to simulate the light coming from the lantern. The lantern was not lit, and the flare was added in post, but it wouldn’t have looked as good had I not added in the bare bulb speedlite simulating the light.
The day we shot the card was a bit overcast, which helped give a nice soft ambient light, but also cut down the time we had before things got really dark. So, we only had about 15 minutes of actual shooting to work out a good expression. This is where working with your girlfriend can be a challenge. She didn’t want to “act”, she just wanted to smile and look directly at the camera. I was trying to get her to imagine as if she was controlling the reigns on Gracie, trying to get her to go, and I was looking intensely into the coming nightfall. This little disagreement cost us some time, but in the end we got the expressions we needed.
I would also like to add, the lantern weighed about 35 lbs. So holding it outright, while seated and trying to push the shutter button from my phone in the other, while trying to not look constipated at the same time was quite a task. It might have added to the intensity of my gaze though. (Let's go with that :P)
In Studio -
The next phase of the shoot would occur a few days later. We set up the white seamless paper, and put a piece of white foam-core over our coffee table so I wouldn’t have any problems masking out Gracie to composite into our scene. I made sure to take measurements with a tape measurer of the exact hight and angle of the camera, as well as the distance we were from it. This was to ensure the perspective was equal for us and Gracie. The biggest problem we ran into while shooting the cat’s part was the lack of cooperation. Initially in my concept, she was going to be standing, and moving forward to simulate her pulling us. What I came to realize was, this wasn’t going to be possible, because all she wanted to do was lay down. But, it kind of added to the comedic value of the photo, since that is a common thing for most cats, and it turned more into us trying to get her to pull us, and she’s just doing her own thing.
Another big thing to remember during this phase of the shoot was to light Gracie in a similar fashion to how we were lit on location. This means I had to provide a replacement for the ambient glow of the setting sun. Lucky for me, I had just been sent the brand new 10-in-1 Westcott Omega Reflector. With the new design, I was able to set the reflector up, gold side facing the cat, simulating the warm glow of the setting sun, and shoot through it. This also provided a perfect catch light in the lower part of her eyes. I was thoroughly impressed with the Omega Reflector and all of it's capabilities. I'll do a full review on it at a later date. The rest of the in studio scene was lit with a Paul C Buff Alien Bee AB800 inside the same 43 inch Apollo Orb. I positioned this as my main light camera right, same as how we were lit on location, and then I lit the white seamless with 2 LumoPro LP180 speedlites. The bounce light from the seamless came into the gold side of the Omega Reflector and provided that nice warm glow I was going for. It's subtle, but it sells the composite!
All that was left from here was to bring everything into Capture One Pro 8 and then photoshop to finish the composite. Here is the final image. I'm extremely happy with it, but there are plenty of things I will do differently next time!
The Video -
First Person Shooter perspective + a full speed edit showing how the composite was brought together in photoshop.
Thank you for taking the time to read this very long post. I thought it would be nice to state step by step how we made this awesome holiday photo! All I can say is, look out for next year's, because it'll be even better! If you liked this post, please share it on social media!
In closing, I'd like to wish everyone a happy holiday season, and I hope you're taking time away from work to spend it with family and good friends.
BONUS:
"Merry Christmas, you filthy animal!... and a Happy New Year."
Name the movie where you hear this famous quote in the comments below!